Showing posts with label School. Show all posts

Sunday, June 12, 2011

Gardening and Thoreau (by way of Gaspereau)

With Tim in London for the triplets birthday this weekend I had little to distract me - so I put on my gloves and rolled up my sleeves and got down to weeding and doing some other gardening tasks.  I am happy to say that all of the things that I planted from seed directly into the garden are doing exceedingly well.
My scarlet runner beans (in the front) are growing like gangbusters! I'm hoping the corn in behind can keep up since the beans are supposed to use the corn as a support.
In fact the snow peas are doing so well that I had to scrounge about for the materials to make an impromptu trellis, as they are already putting out their little feelers.

The snow pea trellis, a.k.a. the Spider's Web. I didn't want to have to buy a trellis system so I scrounged around the yard for dead branches, stuck them in the ground and kitchen twined it up good! It's not pretty but its free and soon enough it will be covered in the snow peas so it will grow into a beautiful thing.
 I also thinned everything out in order to give seedlings more room to grow into big hearty plants - this was exciting for me, as it meant I got to have wilted baby rapini and swiss chard with garlic for lunch....mmmm mmmmm good.  It was delicious but its probably because I grew them myself.

There is just something so satisfying about the results of ones own labour - can you tell I've been rereading Thoreau's Walden. I was reminded how much I love the book by a recent lecturer at Willowbank Andrew Steeves- one of the partners in the small publishing company Gaspereau Press (in the news semi-recently because of The Sentimentalists).

He came to speak about the traditional methods that Gaspereau Press uses in the very modern world of publishing - yet the lecture had very little to do with the use of older technology and much more to do with taking great care in what you do. In Andrew Steeves case that means understanding the needs of the book that you are publishing - from the cover art or lack of it, to the font style, to the sewn binding, so that you create something that conveys the message of the book and will survive to do so for the next century or so. It is really about being respectful and responsible about what you create - which if you've read any novels recently, has not usually been the purview of the huge publishing corporations out there.

Steeves just mentioned Walden in passing within the lecture but it got me to thinking about the book again and how much I liked it when I first read it. I also figured that if I read it again now, it would help to put the summer in perspective i.e. the growing of our own food and saving as much money as we can.  When it comes down to it, I don't think I could give up as much as Thoreau did when he was living on Walden pond (although I don't think that's his point - since he repeatedly pleads for people to live authentically - the lives that they want to live and not the lives their families or society dictates.)  BUT I do think that I can do with much less than many people do and I think I've got my priorities straight when it comes to stuff. That's not to say that we don't have a lot of stuff (much more of it is Tim's than mine!!) but it doesn't drive our lives in anyway and there isn't much that I couldn't part with if and when we move into a smaller place.

On that note, here's a picture of one of the gorgeous peonies that are just beginning to wain from too much rain and wind in the front yard. They were gorgeous while they lasted.

Monday, January 24, 2011

The deed is done...almost

I'm finished my panels!...well almost. It's all glued together and drying and then we'll do the final pegging in a couple of weeks when we have carpentry again. This week, I finished fielding the backs of my two panels and reworked my frames (only slightly) to fit the panels in and then we fitted everything together and voila! a super cool and useless set of panels that has taught me how to saw, plane, make dovetails and lapjoints, make a dado, field and troubleshoot a furniture fit.
My panels and frame all trussed up with pipe clamps. The panels are free fit, so that they can shift about with changes in climate and the frame is attached around them. Right now there is just a bit of glue helping it out. It will have pegs put in each joint as well. But it was a pretty good furniture fit to begin with.
Now I just have to figure out what to do with it. I am of course, super proud of my kinda useless project and am wondering if I should paint it and do a fun artsy thing on the raised panels or if I should just wax it and put it on the wall. Any thoughts?

And then we moved on to some rudimentary large tenons which we will hopefully get to making some mortices for next time around.

The tenon that I made after clamping together the above panels and frame. It will eventually be a through-tenon. I measured and remeasured and cut very, very straight lines so this baby should it's mortice like a hand fits a glove.

Tuesday, January 18, 2011

Wedding Cakes and Stained Glass

I apologize for the long vacation I took from blogging. Needless to say the turn of the new year saw us very busy, with Hen and Cock - a- doos (our english friend's way of saying bachelor/bachelorette party), weddings and getting sick and getting back to school, I could not seem to find a way to get back to blogging. But I'm back now!

The first few weeks of school have been pretty low key anyways, with the exception of doing some glazing (i.e. stained glass) we were pretty boring. Which was good because it gave me time to start making the great big wedding cake for Shaun and Amanda's wedding. Which turned out fabulous - even though it had to sit overnight - it was still delicious and moist - probably due to the 6 lbs.!! of butter in the icing. Everyone loved it - even  the two grandmothers, who were the true taste testers.
Picture of the emcees, our good friends Ilan and Dan, with the cake. You can see the lovely menu we were treated to on the blackboard in the background. And no our friends who got married were not mathematicians though they are academicians and the wedding was at Wycliffe college in T.O.  (Picture is courtesy of the bride's cousin, Simona - Thanks Simona! because I forgot to take pictures of my own masterpiece.) 
And heres the moment of truth from the gorgeous bride and handsome groom! There were no complaints. Also a big shout out to Shaun and Amanda, the lovely couple above, for baking 25 meat and vegetarian pies for their own wedding and for being gorgeous. (Again picture is courtesy of the brides cousin Simona - Thanks again!)

Anyhow, after all the feverish wedding goings-on. I was able to actually get back on track and finished my stained glass project. We were lucky to have a fantastic instructor John F. Wilcox of Vitreous Glassworks who not only taught us about the history of glass (who knew it was so interesting - from Pliny the Elder to Tiffany to Henry Holiday) but taught us how to create our own actually 'stained' glass. We not only got to paint on our own designs and then stain the glass with silver (which turns the glass yellow - so cool!) before firing them in the kiln, we also put together our own pieces - a fun and sometimes dangerous project.

But John's enthusiasm was contagious, and I soon got over my anxiety surrounding shattering glass and the quantities of heavy metals we were coming in contact with (it's not just lead - there are some nasty things in the paints as well). It may have helped to have been rewarded by ending up with a really cool piece - if I do say so myself - complete with morbid skull and all.

This is my piece. Obviously I didn't get a good picture with  light coming through it and as we speak it is blustery snow and overcast out so I can' t even attempt a better picture but you get the idea. The centre is a skull with roses around it and  you can't really see it but the back is stained with silver making the skull a deeper yellow.  The border pieces are recycled glass from St. Leo's in Toronto.

We also went on a little field trip into Queenston to see the stained glass in the Brock Memorial Church - St. Saviour's. It was amazing to see some of what John called the most beautiful glasswork in Southern Ontario. The altar glasswork was absolutely amazing and unlike so much of our modern stained glass which has minimal painting and details and is mostly just shaped coloured glass, this work by McCausland Glass was absolutely resplendent with intricate painted details that really brought the glass to life. We have been to this church before, and it is amazing because you can't really see these details until you are up close to the altar and yet they were still put in, because that was what you did at the time. Just another example of the craftsmanship of the past.

A picture of the altar glass at St. Saviour's. Look at how vivid the colour is - especially in the layering on the shield. And look at the details in the face and clothing. You can barely see them, but those are intricate swirling dragons on the breastplate of the Archangel.

Another stunning view of the details in the altar glass. All of the little border pieces are painted with beautiful designs and I absolutely adore these oak tree pieces that are scattered throughout the piece and were all done by hand.

Saturday, December 11, 2010

End of Term Thoughts...And a bit of a tirade towards the end.

It seems amazing that it is almost Christmas. Time has seemed to fly by during this first semester. I guess that that is what happens when you are really enjoying yourself. I feel so lucky and blessed that I have been  able to go back to school and learn how to do something that truly interests me and that I can see myself doing for the rest of my life. The past couple of weeks have especially struck this home for me. We've had some of the best instructors, who I've really been able to learn from and get a fuller understanding of what I will be capable of doing at the end of all of this.

We've had four lectures that have really stood out for me, two by a Landscape Architect and two by a Heritage Consultant, who were able to really outline the kind of jobs I am interested in pursuing and that I'll be qualified for doing at the end of all this, as a Heritage Consultant. It's really quite an exciting job (perhaps just to me) but as I understand it, I would hopefully get to be a 'renaissance woman.' It would be different for every job, on some jobs I might be the person researching the aspects of a specific historical type of roofing or panelling or the whole interior or the whole exterior. On other jobs, I might be in charge of researching the whole building, its context within its landscape, within it's historical and cultural context, and what to do to conserve/restore/adaptive reuse a building.

It really all seems to now be coming into focus. I now know why we have been learning so many different things, its because we'll never know what will be useful in any one particular job. So we'll need drafting for reading plans and for problem-solving building problems; we'll need hand carpentry so we'll recognize the original techniques used and be able to describe those techniques to our modern tradespeople; we'll need knowledge of architectural styles, well, so that we will know what is typical to one style and what would be found on each individual building, etc., etc.

I am also feeling less guilty about all of the education I already have, and which, everyone seemed to think I should have used in a different way. I am so grateful that I have had a great humanities education, because it looks like all those researching and writing skills will come in handy when I'm writing up reports on built heritage.

I know a lot of people may not really 'get' what it is that we do here at Willowbank, that it might seem a strange way to learn, with constantly changing classes on every topic under the heritage building rainbow. But after having quite a few conversations with Tim lately on how the conventional university model is broken, how it doesn't seem to be about learning how to write and understanding your subjects, it's now all just about getting a good enough grade, so that you can go on and become a lawyer and buy yourself all kinds of nice consumer goods. I am appreciating more and more the approach at Willowbank and that it is really about how much the individual students take away from it and how we apply our knowledge.

I truly feel blessed that I have found a place where the normal teaching method isn't used. Where we are encouraged to get as much out of every class as we think will be pertinent to our interests. Where we have a great balance of practical technique learning, and a theoretical understanding of architectural styles and cultural landscapes. Where links to our history is celebrated and informs the modern use of historic buildings.

And just so that this isn't all completely boring for you and just a monologue on non-traditional learning, here are some pictures of this weeks advances in carpentry class. We are almost done our panels, all of which has been preparation for us learning how to build a door (so that we know how the design of one works). But I'll get more into that in the New Year.

Kristina and her first panel. Can you tell that we were pretty excited to be working on the last step of our project? You can also probably tell that it is ri-donculously hot in the workshop. 
My first panel and its frame. We'll be finishing off the second panel in the new year and than fitting everything together. What you can't see are the awesome dados I chiseled out of each part.
P.S. Now that school is done for the term and we are galavanting all over Ontario I'm not sure how frequent my posts will be. But I'll try to post about anything exciting we do.

Thursday, December 2, 2010

Gingerbread!!

Are you ready to see the most adorable gingerbread house ever? I don't think you are. I don't think I should show you...because it is so adorable that you might not be able to handle it. Honestly.

This week, in preparation for the Rotary House Tour and a night of fun(draising) at Willowbank Kristina, Ashleigh and I, set out to make a fantastic gingerbread house. We based the design off of Bob Watson's house, which you may remember I wrote about way back in September. You should definitely click on the link above to go back and refresh yourself on what Bob's house looks like so that you can see just how awesome our tiny gingerbread house turned out.

It definitely was a labour of love and after much bickering over the recipe, decorations, scale, what should and shouldn't be included (and also about 40 hours of labour, yikes!) we were totally awed and satisfied with our resultant creation. I think if you want to see it there should definitely be a drum roll in here, feel free to drum along. Pa-rum-pum-pum-pum, rum-pum-pum-pum, rum-pum-pum-pum. (Shhh, stop laughing, this is appropriate given the season, plus its the only drum roll I know how to produce with onomatopoeia.)

Anyways, too much to do when no further to do would have done just right.

Ta-Da!:

The front! (And Kristina keeping a very intensely steady hand as she pipes the final details on: the historically accurate downspouts.)

The Side!
The other side and back!
And in case anyone thinks we are crazy for having done this. We thought of it as a self-imposed mini-exam. We discussed so many architectural terms while creating this baby that its not even funny. Also we are now totally down with the proportions necessary for a Georgian/Loyalist house.

This also gave Kristina a chance to spread the word on flooding. What is flooding you may ask? Well, its the method by which we made all that wonderfully smooth stonework on the facade of the house. You pipe regular strength royal icing around what you want to fill in, then you water down the icing and pipe it into the space between. And if you are crazy like us, you apply that to the whole cookie/house.

So we brought this gorgeous puppy into school where they are being auctioned off along with houses by local bakeries and other gingerbread house architects. Here are some of my favourites that I happened to snap pictures of as they were being set up.

We weren't the only students partaking in the auction. Here is Doug's political statement/art piece. Those are little garbage trucks on the bridge dumping 'waste' on the slum below. I'll let you fill in your own commentary and figure out the latin yourself. Hopefully all the little old biddies who will be bidding on them won't remember as much.
I really liked this one. It's really simple but fantastically whimsical and wonderfully executed. I think if I were a bird I'd definitely want to spend Christmas in this house.

And of course I can't leave out Julian and his wife Betsy's Queen Anne masterpiece.  (We snuck into Julian's office yesterday to steal a peek and see what we were up against.)

Saturday, November 6, 2010

F-Stops and Apertures

Thursday and Friday of this week were spent with Cosmo Condina, if you click on his name you can see some of the amazing images he has made. He was great at teaching us all of the ins and outs of photography. At first I couldn't wrap my head around f-stops and apertures and all that, but we played around with taking some photos the first day and it was really fun to start to put everything together and begin to "make" our own images. 
A photo I took in the Bright Salon at Willowbank. I love that deconstructed effect that we can capture in almost every photo. We are lucky enough to be in a building that is an absolutely gorgeous and interesting place to photograph. 
A shot from the main hallway at Willowbank. Again we get that layering affect that I love.

One more photo I "made" that I actually like. It's also in the main hallway, and shows that lovely primitive painting that was used to decorate the walls. I love all of these details that give you glimpses into what Willowbank would have looked like during its various stages of inhabitation. 
It was most awesome to finally figure out how to actually use our D-SLR in a way where I was using it as a tool that I have some sort of control over, and not just as a point and shoot camera. I now know what to do in all of those fancy menus and what will give me the best image to play with. Cosmo suggested that we take everything in a RAW format, so we have the most pixels work with when we shop the photos. He also had many great suggestions on how to portray a traditional home vs. a modern one (as one might imagine, you shouldn't get to crazy with your compositions when photographing a traditional home, but the contemporary buildings you can get crazy with.) By the end of the second day, I was feeling confident in my photography abilities. Unfortunately we were to take pictures outside and it was raining. So now I'll have to start just getting out there on my own and clicking away.


Monday, November 1, 2010

All sawed out, but plane-ly in love

I know it has been a while, yet again, since I posted. But I keep forgetting my camera at home, what I really need is a little point and shoot that can fit in my pocket, its a serious pain to bring the whole DSLR and its accoutrements everyday, especially when I'm walking. And I don't want to give the low down without pictures, where would be the fun. A lot of the past couple of weeks have been in class anyhow, but we are now having a weekly class in the rudiments of woodworking.
Last week we had a whole day on sawing by hand. We spent the whole day figuring out if we had a sawing bias, which until lunch, I did not have, my cuts were seriously square but after food, I apparently developed a bias to the right (don't worry, my politics have not changed). After killing many pieces of junk wood, I do believe that we were all sawed out. And yet,  not sawed out enough, since this past week, we continued to saw, but added in planing as well. At least the planing was a fun diversion from ripping 2 foot pieces of wood repetitively throughout the day.
Doug here is demonstrating what fun planing can be. No really, he does this every time he planes a board.  Just kidding.
Less kidding, more planing. The real Doug at work.
So sawing is okay, it just takes a while and a lot of patience to do it by hand. But planing was definitely fun (as you can tell by the above pictures). We definitely were really trying to kick out the sawing so we could get to the planing by the end of our second day. 

Here we have one of our many sawing trains.
But honestly, we were having fun, and we are learning all of the necessary skills for woodworking by hand, although I think we are definitely getting excited to learn more about joinery. Hopefully our sawing skills are up to snuff.

Saturday, October 16, 2010

More Rock Stars

Somehow I've seemed to have taken a hiatus from writing for a while. It's not that we weren't doing fun things, but somehow 2 seasons of Mad Men had me preoccupied for a couple of weeks. But I'm trying to wean myself off, and am only allowed to watch the third season at a rate of one episode a day. Hence, I'm back to posting.

We've done some pretty cool things since my last post. We toured the Niagara Glen, looking at all of the Carolinian forest we could. It was really cool and über-ambient in a creepy primordial way. The rocks are amazing and look like they have been tossed around by giants and the trees are super old and huge. It was very green when we went though I'm sure that everything has started to change colour now. I didn't get any pictures, because it was raining, but you'll have to take my word that it was beautiful. I'll definitely be going back to repeat the tour with Tim.

We also had another lecture from Julian, and we covered the cultural landscape that was and still is Africville in Nova Scotia. It was a very touching story and although a terrible experience for the people who lived there, it was useful to see the destruction that can be wrought by a lack of sensitivity towards a community's cultural landscape. Unfortunately all we can do now is learn from the devastation that that community felt, but it is a lesson well-learned.

But the real subject of this post is the 3 days of masonry we had this week. That's mason-ry, not mason-a-ry...it drives me insane when people add that 'a' in there. Anyhow, we had a great instructor, Johnny Laundry, (awesome name right!) who taught us the basics of squaring up stones and some rudimentary finishing. You'd think that all of this would be very easy, and the concepts are, in practice though we made a lot of gravel. One wrong hit and your stone could be through. I think unless any of us actually become masons, we should probably stick to rubble stone houses or leave the intricate stuff to the experts.
Here I am going to town on Kristina's mother of a rock.  Eventually that huge chunk came off the back. Do you see the size of that hammer?

These are our finished squared rubble rocks. I think we each completed one, or at the most two  in one day. Johnny could do one in 5 minutes. 

The chain gang. These were already squared St. Matthew sandstone that we were shaping to make a  window arch.
Sometimes the shaping got a little out of hand. And stones would have to be abandoned.
Here is a shot of how we finished the arch stones. The small scoops along the edges of the stone are called boasters batted margins. The middle was then henpecked sparrow-pecked out. Unfortunately I didn't get a finished picture, as there are still a few more stones to be completed.
P.S.: The above corrections were given by Johnny Laundry, who was I'm sure very excited to find out he is famous in my very small blogosphere, but less thrilled that I had apparently not learned the proper masonry terminology.

Thursday, September 30, 2010

Restoration Heaven

So yeah...we saw the most amazing house today. Our geology instructor Bob happens to own the house that I have been lusting after since we first visited the niagara region. It is a beautiful stone house that he has lovingly and painstakingly and perfectly extended, restored and conserved. This is the kind of project I am sure every skilled tradesperson dreams of being able to work on but is like a one in a billion project.

The front of Bob's house. Isn't it beautiful!
And the back. Also striking!  You can see the extension added on at the far left hand side.
Bob is a geologist who was raised in this area, but made his living in Calgary ('nuf said) and has retired back to this area. He is an incredibly sweet man and very very meticulous (two bound volumes on Niagara stone's worth of meticulous). We now are able to identify the stones that would have been quarried and used in this area to a tee. In fact, I'm pretty sure that we'll be whipping out our hand lenses and inspecting every heritage home, just to make sure that the write ups and plaques are accurate when they describe a building as limestone, because usually the plaques are wrong and they are dolomite or crazily whirlpool sandstone! Insane stuff, but now we know stone and all the unfortunate things that can happen to it when its not properly maintained - like when people use portland cement to repoint a wall. The results are nasty and heartbreaking, not to mention stone-breaking!

But the highlight of our day today was when our instructor gave us a tour of his home. It is a stone heritage house that he and his wife and a crew of 13 have been restoring and extending. The house is ah-mazing! And it was incredibly inspiring to see this kind of thought and painstaking care going into a building.

Being a geologist, Bob was very concerned with making sure that the right stones were used in the extension and in any of the replacement sills. Every piece of stone worked in the building - and there were a lot - was done as it would have been done originally by hand by a stonemason.
This sill happens to be from the last piece of whirlpool sandstone quarried from the Queenston Quarry. You can see the beautiful tooling and slight angling out of the sill. All done by hand!  The "crack" you can see in the sill towards the right side of the picture is actually very characteristic of whirlpool sandstone, it is where a shale pebble would have been and has now eroded, because it was much softer.
Even the landscaping edging is hand cut and tooled! With a mitred edge! 
There have been so many thoughtful and innovative solutions that have resulted from this restoration. All of the air intakes and vents are hidden beneath or behind the eavestrough. They even had a 'smokehouse' built to house all the ugly utility meters so that they wouldn't be visible inside (also all of the utilities are buried, so there is not a single ugly wire coming into the house).
The 'smokehouse'. They even built in fake windows that were bricked up from the first (with sills and everything!) for  the utility meters that have to be read from the outside.
The same care that Bob and his wife have had for the outside has been carried on inside. The floors have all been plank by plank stripped and recoated 8 times, individually! Walls that were external and had a coating of soot but are now inside, have been painted to look like the stones were always inside (i.e. never touched by soot - he assured us they did try to clean them but it didn't work). In the basement they stripped the whitewashed stone, but couldn't get all the different coloured coats of lime off, so new walls were mottled with similar bits of lime, to make the effect continuous. All of the outlets are recessed into the baseboards, with tiny little doors over them - so  they are not intrusive and historically inaccurate.

The tiny doors on the recessed outlets.  A corded outlet comes out when you need it and then just tucks away. Amazing detail!
 The stone detailing is absolutely beautiful inside as well. Every washroom has a beautiful all-stone shower stall. Every fireplace has beautifully tooled stone surrounds and hearths. And the new extensions have gorgeous lintels and sills in the doorways.
The shower in the basement bathroom. Insanely gorgeous!
The stone lintel that over the doorway that leads to the conservatory. It is so beautifully hammered,  producing the mottled effect in the centre of the lintel.  This is also the room that had the walls painted to cover the soot. Can you tell those stones are painted? or were ever covered in soot?
This a properly built, in working order, Rumford fireplace, renowned for its incredible draw (created by a very narrow chimney and side walls), this type of fireplace is rarely seen these days, but it is supposed to be incredibly efficient. You can see the freshly plastered chimney breast. It was old-school plastered by the man who will be teaching us about plaster later on, it incredibly takes a year to cure before painting. You've got to have some serious patience with this kind of work. All of Bob's house was plaster on stone where possible, except for two instances when drywall was necessary. He says that it makes for a very easy house to heat and cool. They didn't even put in air conditioning, it is that great.
Even all of the light fixtures are rewired restored originally gas fixtures and they are all incredibly gorgeous. They are from a man who does them all by hand at Ruth Jones Antiques in St. Catharine's.

Two of the many beautifully restored light fixtures in Bob's  home.   Everything just feels so authentic!
I can't even begin to explain how incredible it was to have the opportunity to see such a project (almost completed) and to witness such a great respect and love of history and built heritage. I think that the tour of Bob's house really inspired all of us today, and showed us that there are people not just all us crazy conservation students, who do really appreciate traditionally and skillfully built homes. I'm pretty sure that a landing a project like this would be like going to restoration heaven.

Sunday, September 26, 2010

No pain, no wall...I mean, gain

On Friday we finished the dry stone wall we had started on Thursday. The job was fun, but very hard work.  Surprisingly, it was my thighs and wrists that hurt the most. Thank goodness we spent a lovely and relaxing weekend in London, ON, visiting with Tim's family and I am mostly recovered now. I think that dry stone walling could start to be offered at gyms in lieu of weight training from the burn I was feeling, but we got the project done and now you can go and see it for yourself at the Niagara Parks School of Horticulture any time you are in the area and you can think of all the pain that went into it! It was a rewarding experience though, the concepts are really quite easy to learn and I think with a little more practice I could be semi-good at making a dry stone wall on my own. I think it's a great skill to have in my back pocket for when we actually own our own property.

Here is a picture of the wall completely ripped apart:
After pulling out the completely buried pieces of stone on Thursday, we made sure to properly prep the wall before rebuilding it. You can see the gravel and landscaping fabric which will keep the stones from becoming completely buried in soil again.

And here is a picture of the finished project:
Yes, that is Geordie doing his best modeling pose on the finished wall, while Dorothy in the background actually is continuing to shim wiggly stones. I'll leave you to pass judgement, on both the pose and the wall.

Thursday, September 23, 2010

Stonehugging 101

Today we had our first of two days of classes where we learn to build a dry stone wall. And... I am exhausted.

Our instructor, John Rimmington-Shaw is a wonderful man who was previously a stonemason but became disenchanted because so many people have gone towards decorating with stone, i.e. creating facades, instead of using it structurally. He went to the UK to learn how to build dry stone walls after experimenting  a bit on his own property and is now the founder and president of the Dry Stone Wall Association of Canada. (If anyone is interested in learning the art of dry stone walling, John leads demonstrations and classes all over the place you can find links to the classes on the dswac website linked above.)

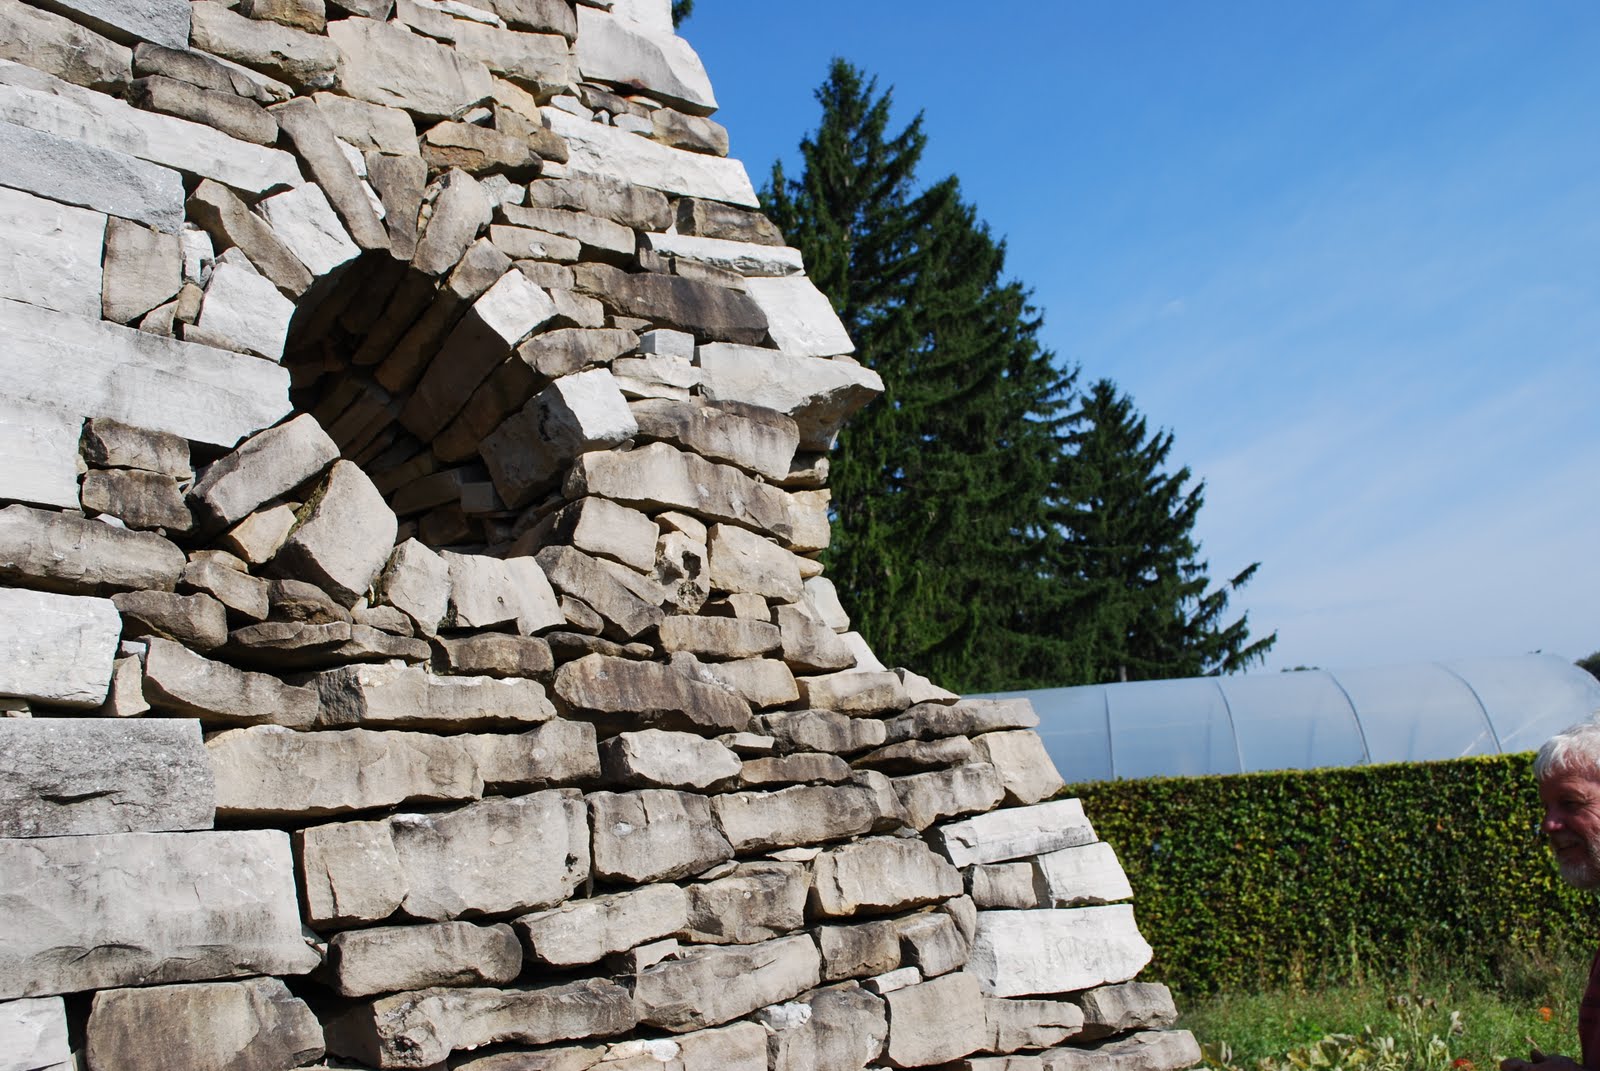
After teaching us the basics in about an hour we set off to the School of Horticulture on the Niagara Parkway, which is a gorgeous place to take walks if you are ever in the area. We started off by looking at some garden sculptures or follies, that John and other groups had previously built. They call them respectfully, the Cheese Wedge and the Veg Wedge:

The Cheese Wedge: It's very hard to see in this picture but there are is a hole through the centre of it and  cool corbeling at the sides, so that it looks like a big slice of swiss cheese. (It is also in a pumpkin patch, which is cute.)
The hole in the cheese wedge goes right through it and you can see the corbeling affect a little better in this picture.

The Veg Wedge is near the horticultural schools student gardens and is covered in a luffa plant but is a fun free standing wall that was built with the intention that it should be used for plantings.

We were a bit disappointed when we came upon what we were to rebuild, it actually didn't look too bad and it wasn't very high.

I forgot to take a picture of it before we started but in this picture you can see that we had only taken off the coping stones and the first layer of stone, so it was really not that high.
So we kind of slacked a bit, and took a long lunch, thinking that we'd have it rebuilt by the end of the first day of class and have tomorrow to build arches and play with stone. Little did we know, that there were 3 extra layers of stone beneath the soil, embedded in clay. By the end of today we had only removed all the stones and prepped the base with new gravel and landscaping fabric to keep the soil away from the stones. I was so tired and blistered and heat-stroked (what is with the last push for summer coming on the day we are shoveling in full-sun?!) that I didn't even have enough energy to take pictures of the prepped area, but those will be supplied tomorrow, I promise!

We did get to take a bit of a break to learn how to shape the stone, which was perhaps the coolest part of the day. I had no idea that the stones were shaped before being used. Well, for the most part many of them are just used as is, if they have good facing and are deep enough to function structurally, but if they are not they are shaped to be useful and to create hearting (the rubble-ish stones that are used to infill a stone wall and create the friction between the front and back faces which makes dry stone walls so stable).
Here my classmate Geordie is "nibbling" away at the stone to create a more even surface. What's neat about this process is that all of the stone you remove is needed, because you will use it for hearting when you build the wall. It's a pretty ecological approach to building, which isn't often seen in any other construction.
Earlier, when we were learning the basics of dry stone walling at school, John had given us some philosophical pointers about stone and the art of dry stone walling. He encouraged us to slow down and take our time with the stones. He likened them to wild animals, which you wouldn't make sudden moves around and approach quickly, as that's when they would be tempted to bite you or in the stone's case, jump on your foot! He also encouraged us to listen to the stones, because they would tell you where they needed to be tapped and where they wanted to go in the wall. He assured us that all stones really want to be part of walls and are willing participants, we just have to let our hands think for us and suspend our spatial disbelief, because the stones will find their spot in the wall. John's blog has more on the "consciousness" of stone and how one should approach the stone characters of a wall, as well as some beautiful pictures of projects he has worked on and excerpts from a novel he is writing about stones in a dry stone wall and the process of dry stone walling.

All this prep, both physical and philosophical, has really given me an appreciation for this art (which it really is). Before I had thought of it as just piling up stones, now after a few lessons in Stonehugging 101, I realize there is a definite strength in dry stone walling that is really quite beautiful because it works with the natural world and with little manipulation, we can use physics to create something that will do a job for many many years and be beautiful doing it, without mortar or any other glue. Stones are definitely rockstars, in their own way. That's right, I said it, get over it.

Tuesday, September 21, 2010

Mortices and Tenons and Pegs...OH MY.

For the last two days we've been learning about Timberframing, like old school, like so cool. Apparently I am now a heritage construction and conservation nerd and I'm pretty sure I could sit and make pegs all day on a peg bench. That's right, a peg bench (see below). Or I could alternatively, be the underdog and take the box on the pit saw - cuz I'm a natural, and I'd have a wicked upper body after doing it for like a week. Timber framers are insane! Or at least old school ones are.

Our instructor Dan Addey-Jibb is an anglophone from Quebec, who studied Marketing in university and then decided to become a timber framer. He apprenticed in England and Scotland and has worked on a tonne of super cool amazing projects in Europe. When he came back to Canada he set up a company that does old-school-scribe-method-medieval-on-your-butt timber framing, and it is amazing. His company mainly builds residential houses, but they have done some amazing reconstructions of historical barns and some really great conservation on historic buildings. You can check out a fantastic time-lapse video of the raising of a huge barn in Quebec that they just recently restored, and you can look through his gallery at www.heavytimberwork.com.

Yesterday, we learned about the history of timber-framing in Europe and touched on the differences between the European-style scribe method and the North American style of square method. As per usual the North American style is not as cool or authentic. So I'm going to have to choose sides and go scribe method all the way. It's way prettier! We also got to look at pictures of all of the amazing projects that Dan has worked on, which was sooo freaking cool. Dan showed us the work of one of his colleagues in Ireland, who is amazing, insanely amazing, he even does his own carving. You can check out a video of work he did on Claregalway castle. It'll blow your socks off!

Today we got to go outside and make stuff and play. Yay! We got to look at some real mortices and tenons, and ask a bunch of silly questions about silly old english names for things. Apparently etymologically all those sayings about being Top Dog, the Under Dog, being "in the pits" and such, all come from working on the pit saws. We got to do that. It was totally awesome, and a serious workout.

Two of my classmates on the pit saw. Since it's a demonstration set, they have built these tripod saw-horse type things to  approximate the height difference for the pit. When you are on top you are Top Dog, when you are on the bottom you are the Under Dog. 
Here we are making our own pegs on a really cool peg bench. That was fun. We split the wood and then  used a scraper to shape it and a chisel to point it. It was really neat, and I got to keep mine. It'll definitely come in handy should a vampire attack, since most of our pegs ended up looking more like stakes.

You can see my classmate Kristina making a peg on the peg bench, which was a pretty cool thing in itself. It detaches for portability and works really well to hold the peg in place semi-permanently so you can rotate the peg and work on making it round. Alycia is in the background getting frustrated at the block we had to split our pieces off of to make the pegs.

We also massacred a log. We started off trying to get a feel for hewing by hand using axes. The piece of wood we had to use was not great though, it was from the previous year and it hadn't been stored properly so it was starting to rot and grow mushrooms, but we did the best we could. Though by the end of the day, after we had hewed what we could and tried auguring and making mortices and adzing (is that a verb?) the log was pretty much toast.

Here is one of us hewing. It's really quite tough to do, although I'm not sure the feel of it was accurate considering the state of the log. I'd really like to try doing it on a new green log just to see how it feels.
At the end of the day we went on a little field trip to a barn in Fonthill, ON. The documentation group had documented the barn during the summer and it was a really interesting example of the meshing of North American styles with a bit of Old World ingenuity. The lovely woman who owns the barn was gracious enough to let us crawl over every inch of the barn and explained that it had been built in 1885. Unfortunately she doesn't have the resources to restore it and it will likely fall to ruin because the township she is in won't let it be taken down and rebuilt elsewhere since it has been designated an historic building. This is an unfortunate result of some historical designations. Inevitably saving a building for posterity doesn't do any good, because it will likely come tumbling down because those who make the historical designations don't give out any money to maintain them.

A lovely barn, but it's in a state of disrepair. There is a bulge on one side of the stone wall and some of the supports inside are starting to fall down. The style is quite unique, with the dormers, the steep slope and the half-gambrel, half hipped roof.

One of the most interesting features were these huge pulleys. There were two, located in the middle of the building towards the front (southern-facing). They were used first by horse power, then by tractor, to hoist up a wagon so that hay could be off-loaded onto the upper level of the barn. Dan had never seen anything like it in Quebec, though the owner said she'd seen another like it in Bright, ON. 
All in all, our last two days have been wonderful. I've really enjoyed getting to get in there and getting a little sweaty and full of wood shavings. As well as working-in my work boots by trudging around through twenty year old "compost" and hay. I think that I'm in love with timber framing and will be forever, at least  until we have our dry stone walling class on Thursday and Friday. Oh, be still, my fickle heart.