Friday, December 24, 2010

Merry Christmas Everyone!

Just a quick note to say Merry Christmas to everyone. We didn't send out Christmas cards this year, I know, yet again. But hopefully this blog will stand in for our once upon a time annual newsletters. 

I really appreciate everyone who has been keeping up to date with my/our goings on in Niagara. This blog has ended up being a communication lifeline to a lot of family and friends and I'm so glad and thankful for that.  (Just in case anyone wants to leave comments, its kind of a silly application, but you have to click on the "0 Comments" at the bottom of a posting and then a template will pop up that you can leave a comment on.)

We are thankful to be healthy and happy and living life to the fullest in Niagara. I have felt blessed to be on the path that I know find myself on and wish to thank everyone who has supported us on our journey. I guess that Christmas is as good a time as any to be thankful and I am!

So thank you one and all. Have a great Christmas and New Year's with your family and friends. I will be having a great holiday with all of mine and will be back to posting again in the New Year.

Merry Christmas
Love,

Crystal and Tim

Nana's Biscotti Recipe - Best Christmas Gift Ever

Nana's Biscottis - not your typical biscotti.

This holiday season I made it my mission to finally get my Nana to teach me how to make her biscotti. These are not your typical and now ubiquitous sweet sugary cookie (see my last recipe entry) but a delicious savoury snack that is somewhere between a pretzel and a bagel. Crunchy and texturally awesome, they are boiled and then baked like a bagel, but they don't remain soft on the inside, they get airy and flakey all at once. And the breaking of the biscotti oval becomes an addictive ritual that nothing can beat. You can sometimes find similar treats called Taralli in Italian specialty stores, but they never seem to be the same - often they are flavoured with anise seed or are sweetened or are just too darn hard and they just aren't the same as my Nana's biscotti.

As a child, I would be given these breadstick-like but sooooooo much better oval shaped "twice-cooked"  treats. They were always around for a snack and we dipped them in coffee/espresso, we dipped them in tea, we dipped them in plain old water (very true and an excellent teething ring) and I adored them. I didn't know how much I'd miss them until I left home and Nana started sending me them in care packages. That's why the recipe is one of the best gifts I've ever received - mostly because Nana took the time to actually measure everything (her recipes usually consist of: "a handful of this" and "a handful of that" and my hands are a very different size than my diminutive Nana's.)

Since Nana doesn't make them very often, I figured I should get her to pass on the knowledge. But that has caused some upset in the family who think that the recipe should remain a family secret but I think they are just too good to keep to ourselves and I've got to spread the biscotti love. 

But be forewarned, I now know why Nana doesn't make them very much anymore - they are über labour intensive. You  have to create a fairly stiff dough, knead it like crazy, roll them out into tiny lengths of dough, boil those, cool those, bake them for 30 minutes and you are done but mulitply that process by a bajillion biscotti and you get tired. 

So here is the recipe. Note: It makes a huge amount, but you could always cut it in half or thirds. Also, although Nana tried her best to actually measure the ingredients, a lot of it was still by eye or feel and I had to guesstimate what was actually going in to the bowl.

Nana's Biscotti

13 cups flour
4 tbsps salt
1/4 c. Crisco
1 1/2 cups luke warm water
1 tsp. sugar in the water
3 tbsp. yeast in the water 
2 eggs whisked 
3/4 cup vegetable oil
Another 2 cups of water

1. Stir salt and flour together. Add crisco and cut up into small bits that will be distributed through the dough as you knead it.
2. Knead dough for 20 minutes. There is a lot of dough, so you can cut it in half and knead the halves separately then put them back together and continue splitting and kneading and putting them back together. 
3. Cover with plastic wrap and let rest for 5 minutes.
4. Knead again for another 10 minutes more, continuing with the split and put back together method.
5. Roll out the dough into mini-loaves of bread (its best to split the dough in half and keep half in the fridge covered in plastic wrap so it doesn’t rise). 
6.Cut each mini-loaf into inch wide pieces (the size depends on how big you want to make the biscotti - you’ll get a feel for it as you make them). Then roll each little piece out into a long rope-probably about a foot long - loop it around and press the ends together. Nana said she used to use a key to press the two ends together, but if you press your nail into them it works too. Just make sure your nails are clean!

7.While you are rolling out the biscottis put a wide deep pot off water on to boil with about a tbsp. of salt in it. Bring it to a rolling boil and place the rolled out loops of biscotti into the boiling water. They should sink to the bottom of the pot and when they rise up they are done. Remove them from the pot and place them on a clean kitchen cloth to dry. 

8.Set oven to 350 F. When it is to temperature, place the biscotti on the rack - this is important - not on a cookie sheet. The airflow around the biscotti is what makes them crunchy, if you put them on a cookie sheet they will just end up like little bagels - soft and chewy. Bake them for 25-30 minutes, but make sure to watch them, because depending on your oven they could burn. You’ll have to rotate them to keep them cooking even. You want them to end up a deep golden colour on both sides and they will be done. Nana says that depending on your oven you might not have to turn them, but hers bakes unevenly, so we had to move them around from front to back and flip them. 
Note: There are two ways of setting up your biscotti creating assembly line. You can roll out the biscotti and boil them all first, then begin baking them in the oven. Or you can keep the dough in the fridge and only roll out and boil and bake a batch at a time - this method kind of gives you a break in between rolling the loops out.  At the end of it all, Nana puts all the biscotti in a big metal pan and just leaves them in the oven overnight to let them finish drying out.


Sunday, December 19, 2010

Chocolate-Dipped Ginger Almond Biscotti


When I was in my second year of university my roommate at the time went into a frenzy at Christmas time trying to find dark chocolate dipped crystallized ginger to give his mother for Christmas. He couldn't find any,  so we made some. That is how I was introduced to the heavenly delight that is dark chocolate dipped crystallized ginger.

I hadn't really thought about making any this Christmas and then I got a request for biscotti. Then I went to the bulk foods store to get the almonds and dark chocolate for dipping my almond biscotti in and I saw a bin of delicious crystallized ginger. Now I love ginger in all forms but crystallized ginger is my fave (mostly because it's made just for me, you know 'crystallized'). So I thought, it's Christmas, lets chop up some ginger and take these dark chocolate dipped almond biscottis up a notch. And just like in that second year of university, it was a delicious revelation. I definitely recommend this recipe.

This recipe is borrowed and altered from the Joy of Baking website. You can change up what you add to the recipe - hazelnuts are good or  lemon peel with a lemon glaze in place of the chocolate dip.

Chocolate-dipped Ginger Almond Biscotti


1 c. slivered almonds
1 tsp. baking powder
1/8 tsp. salt
2 c. flour
3/4 c. white sugar
3 large eggs
1 tsp vanilla
1/2 tsp. almond extract
1 c. finely chopped crystallized ginger

1. Preheat oven to 350 F.
2. Toast almonds until fragrant and golden, 8 minutes.
3. Reduce oven to 300 F.
4. Combine dry ingredients, including sugar in a large bowl. In a smaller bowl, whisk eggs, vanilla and almond extract. Mix wet ingredients into dry ingredients. You can start out with a wooden spoon but will need to get your hands in there to incorporate everything. You'll think it's too dry but it will end up becoming a sticky dough, just be patient and mix.
5. Form into one long 6 inch wide, 1 foot long, 3/4 of an inch high log and place on a parchment lined cookie sheet. Bake for 45 minutes.
6. Remove and let cool for 10 minutes and then cut into thin (1/2 inch cookies) with a serrated knife. Lay them all back out on the cookie sheet and bake for another 30-40 minutes (15-20 minutes on each side) or until they are no longer soft (although they are tasty soft as well).

Note: I like to coat half of each biscotti with dark chocolate (which I melt in a double boiler and then dip each one in and smooth it out with a spoon.) I usually use dark chocolate melting wafers but you could use chocolate chips or chopped chocolate. Or you can leave your biscottis naked. They are good that way too.

Monday, December 13, 2010

Fesenjan and Sweet Potatoes with Celery Walnut Blueberry Salad


Apparently I didn't bring enough to do this first week of Christmas break. I think I've forgotten how to just relax for long periods of time. So now I'm cooking (and blogging about cooking) at the in-laws. Maybe I should start a cooking tv show, that would be an awesome name for a cooking show, no? Cooking at the in-laws - it involves a stocked fridge, freezer and pantry and me figuring out what I can make in the kitchen.

Tonight, I decided I would whip out a recipe I found on Smitten Kitchen for Sweet Potatoes with a delicious celery salad topping. I made it last week, before we left for the holidays, and I do believe it is my new favourite side dish. I had made it before with variations in the salad topping, dried cherries instead of dried blueberries but only because I had them leftover from the Chocolate Cherry Breakfast bread I was making. I also served it with very simple chinese-five-spice and honey rubbed chicken breasts. This time around, being as I had more time on my hands I decided I would make Fesenjan, which I had made a few years ago when I was still personal-cheffing (whatever accept my lexicon and get over it - I cheffed - its a new verb.) 

Fesenjan is a delicious middle eastern chicken dish with pomegranate and walnut sauce. It has a lovely complex flavour and the sauce is very hearty as its thickened with ground walnuts but has a very pretty colour from the pomegranate juice. You can find all kinds of variations on the web. It typically includes pomegranate molasses, and although pomegranates have become fairly commonplace these days, I still haven't been able to lay my hands on pomegranate molasses -if you see some let me know. Instead I just use pomegranate juice and some honey and let the sauce boil longer.
The roasted sweet potatoes -disregard the oil, most of it ends up staying in the pan,  but look at how gorgeous they brown up.
Sweet Potatoes with Celery Walnut Blueberry Salad Topping

Sweet potatoes cut into 2 cm rounds
Olive Oil
Salt and Pepper
3 ribs of celery, diced
1/2 c. dried blueberries
1/2 c. toasted walnut pieces
1/2 c. crumbled stilton or other blue cheese

1. Set oven to 450 F. 
2. Oil a baking sheet generously - like 1/3 c. generously (I know it seems like a lot but most of it will stay on the sheet and it will really brown up your sweet potato rounds). Place your sweet potato rounds on the sheet and season them with salt and pepper. 
3. Bake until the first side is brown and blistered then flip and season the other side. They'll likely take 10-15 minutes a side.
4. While the sweet potatoes are baking, make the salad topping by just throwing all the ingredients together in a bowl. Consider changing out any of the ingredients for something else; for instance if you aren't a big fan of blue cheese try goat cheese or aged cheddar. You could always try toasted pecans or almonds in place of the walnuts and like I said earlier, dried cherries are really good in place of the blueberries, or maybe even raisins.
5. Serve the sweet potato rounds with the salad topping heaped on top.

A simmering pan of Fesenjan. So delicious.
Fesenjan (Pomegranate Walnut Chicken)

4 chicken breasts
1 tbsp. olive oil
1/2 red onion
3 cloves garlic, minced
2 tbsp. tomato paste
3/4 c. ground walnuts
1 1/2 c. pomegranate juice
2 tbsp. honey
1 c. chicken stock
Salt and Pepper

1. Heat the olive oil in a skillet over medium heat. Season the chicken breasts and brown on both sides. Remove the chicken breasts from the pan. 
2. Saute the onion until translucent, add the garlic and saute for a minute more. 
3. Add the tomato paste and cook it for 2-3 minutes or until the colour deepens and its not raw anymore.  
4. Stir in the ground walnuts, then the pomegranate juice, honey and chicken stock.  Let this mixture come to a simmer. Add back in the chicken breasts and let the whole lot simmer away for 10-15 minutes,  continuing to stir frequently. The sauce should thicken up nicely.

Bon Appetit! 

Saturday, December 11, 2010

End of Term Thoughts...And a bit of a tirade towards the end.

It seems amazing that it is almost Christmas. Time has seemed to fly by during this first semester. I guess that that is what happens when you are really enjoying yourself. I feel so lucky and blessed that I have been  able to go back to school and learn how to do something that truly interests me and that I can see myself doing for the rest of my life. The past couple of weeks have especially struck this home for me. We've had some of the best instructors, who I've really been able to learn from and get a fuller understanding of what I will be capable of doing at the end of all of this.

We've had four lectures that have really stood out for me, two by a Landscape Architect and two by a Heritage Consultant, who were able to really outline the kind of jobs I am interested in pursuing and that I'll be qualified for doing at the end of all this, as a Heritage Consultant. It's really quite an exciting job (perhaps just to me) but as I understand it, I would hopefully get to be a 'renaissance woman.' It would be different for every job, on some jobs I might be the person researching the aspects of a specific historical type of roofing or panelling or the whole interior or the whole exterior. On other jobs, I might be in charge of researching the whole building, its context within its landscape, within it's historical and cultural context, and what to do to conserve/restore/adaptive reuse a building.

It really all seems to now be coming into focus. I now know why we have been learning so many different things, its because we'll never know what will be useful in any one particular job. So we'll need drafting for reading plans and for problem-solving building problems; we'll need hand carpentry so we'll recognize the original techniques used and be able to describe those techniques to our modern tradespeople; we'll need knowledge of architectural styles, well, so that we will know what is typical to one style and what would be found on each individual building, etc., etc.

I am also feeling less guilty about all of the education I already have, and which, everyone seemed to think I should have used in a different way. I am so grateful that I have had a great humanities education, because it looks like all those researching and writing skills will come in handy when I'm writing up reports on built heritage.

I know a lot of people may not really 'get' what it is that we do here at Willowbank, that it might seem a strange way to learn, with constantly changing classes on every topic under the heritage building rainbow. But after having quite a few conversations with Tim lately on how the conventional university model is broken, how it doesn't seem to be about learning how to write and understanding your subjects, it's now all just about getting a good enough grade, so that you can go on and become a lawyer and buy yourself all kinds of nice consumer goods. I am appreciating more and more the approach at Willowbank and that it is really about how much the individual students take away from it and how we apply our knowledge.

I truly feel blessed that I have found a place where the normal teaching method isn't used. Where we are encouraged to get as much out of every class as we think will be pertinent to our interests. Where we have a great balance of practical technique learning, and a theoretical understanding of architectural styles and cultural landscapes. Where links to our history is celebrated and informs the modern use of historic buildings.

And just so that this isn't all completely boring for you and just a monologue on non-traditional learning, here are some pictures of this weeks advances in carpentry class. We are almost done our panels, all of which has been preparation for us learning how to build a door (so that we know how the design of one works). But I'll get more into that in the New Year.

Kristina and her first panel. Can you tell that we were pretty excited to be working on the last step of our project? You can also probably tell that it is ri-donculously hot in the workshop. 
My first panel and its frame. We'll be finishing off the second panel in the new year and than fitting everything together. What you can't see are the awesome dados I chiseled out of each part.
P.S. Now that school is done for the term and we are galavanting all over Ontario I'm not sure how frequent my posts will be. But I'll try to post about anything exciting we do.

Saturday, December 4, 2010

It all started with Ginger Snaps...

So I told myself that I wasn't going to do any Christmas baking this year. Really I did. And when I woke up this morning, I had no aspirations of spending my whole day baking but then it just happened and now it's 8 pm and my table looks like this:


To be fair. It did all start out fairly innocently. I had a tin of pumpkin and some cream cheese which I had bought specifically to make mini pumpkin cheesecakes with so that we would have single serving desserts in the freezer. I looked at a few recipes for pumpkin cheese cake and decided I wanted to make the recipe with gingersnaps as the crust. But alas, I did not have any. So yes, alas (again), I had to make some.


I found a quick recipe, that I managed to make and bake before Tim even woke up this morning. After eating a few of those, we decided to go to the gym and burn off the bad-ness that was oh-so-good gingersnap heaven.


So, we came home, I made the uber-healthy mini-cheesecakes (I'm not kidding they are way good for you!)  and then I proceeded to make: amaretti, chocolate macaroons, healthy banana chocolate cookies, hot cross buns and cherry chocolate breakfast bread.


Uh huh, I know. But every recipe was super easy and is as healthy/natural as I could make it. Everything (minus the bread products which I am making for my New Year's Crew, well in advance so I am not freaking out when I get home from the Christmas holidays) is very low-fat, low-ish in carbs, uses agave nectar in place of sugar and what not and so forth.


So there Christmas baking, you will not be my downfall. Until I get home and eat all the things that are full of butter and sugar that everyone else is making. But I'm not going to think about that.


Here are the recipes I made today.


Gingersnaps (for the Pumpkin Cheesecake crusts)

These were surprisingly good and crispy. The oil kind of freaked my out, but it meant I could make them quickly and with a whisk and a wooden spoon instead of the beater (which was helpful, because Tim was still asleep and apparently I can be super nice and thoughtful - it doesn't happen often, I know). This bonus also makes them a good cookie to make with kids. If you want a good soft ginger molasses cookie (a la Starbucks) I suggest checking out Elise's recipe for Giant Ginger Cookies over on Simply Recipes, they are my absolute fave ginger cookie.

  • Ingredients 

  • 1 cup packed brown sugar
  • 3/4 cup vegetable oil
  • 1/4 cup molasses
  • 1 egg
  • 2 cups all-purpose flour
  • 2 teaspoons baking soda
  • 1/4 teaspoon salt
  • 1/2 teaspoon ground cloves
  • 2 teaspoon ground cinnamon
  • 2 teaspoon ground ginger
  • 1 tsp. ground cardamom
  • 1/3 cup white sugar for decoration

Single Serving Pumpkin Cheesecakes
The verdict is still out on these. I am reserving judgement until I see how well they freeze, which was the whole point. I think I used too much pumpkin, but I wanted them to be more pumpkin than cream cheese. I just went a little overboard. I also think that a bit more agave syrup would have served well. All in all, they are more like mini pumpkin pies with some tangy zip (but no miracle whip).

Ingredients


1 pkg. light cream cheese, at room temp.
1/2 c. agave syrup or 1 c. sugar
3 eggs
1 can pumpkin puree, ( I used all of a 28 oz. can, but I think a 14 oz. can would make them more cheesecake-y and less "healthy")
1/2 c. greek yogurt
2 tsp. pumpkin pie spice
Gingersnaps

Directions:

Make the gingersnaps first. Duh.

1. Preheat oven to 375 F.
2. Mix brown sugar, oil, molasses and egg. Sprinkle the baking soda, salt, cloves, cinnamon, ginger and cardamom over the mix. Stir. Add in the flour a little bit at a time, until it is all incorporated. 
3. Roll the dough into small balls, 3/4 of an inch is what I did because you want them to fit into the bottom of your muffin tins). Roll the balls in white sugar, before placing on a parchment covered baking sheet.
4. Bake for 10-12 minutes. Cool on wire racks.
5. While the cookies are cooking, you can prepare your pumpkin cheese cake filling. Start by whipping up your cream cheese and adding one egg at a time, until incorporated. Mix in the agave syrup. Add the pumpkin puree, greek yogurt and pumpkin pie spice and mix well.
6. Once the cookies are cool, line muffin tins with a muffin papers and place a gingersnap in the bottom of each hole. 
7. Fill each about 2/3 full with the pumpkin mixture. Bake for 30 minutes. If you use a full 28 oz can of pumpkin puree, they will be much more like pumpkin pies when they come out of the oven. If you use a smaller can I think you'll end up with a much more cheesecake-y texture.


Amaretti


I like my amaretti somewhat soft. This is a recipe that will give you something in between on the hard/soft scale. These are one of my all time favourite Christmas cookies, and I tend to make them every year. This year, I tried to scale down the recipe a bit so that I didn't have a tonne of them, which I would end up eating all on my own. I also replaced the sugar that normally goes into them with agave nectar and it ended up changing the texture. They turned out less chewy than I normally like but the flavours are still there, so I'm happy.

Ingredients

5 egg yolks
3 egg whites (this ratio sort of just happened because there were two double yolk eggs, otherwise I'd just use 4 whole eggs)
2 3/4 c. ground almonds
1/2 c. agave nectar (or you could use a cup of white sugar)
Enough bittersweet chocolate chips for each cookie (about 3 dozen) I like Callebaut but use what you've got (also, its kind of more Christmasy/fun to use those insanely died maraschino cherries (in green and red) instead of the chocolate chips but I didn't have any and they are all sugar.

Directions:

1. Whip the eggs until they are frothy with a beater. Add the agave nectar or sugar and mix. Add the ground almonds and mix with a wooden spoon. 
2. Roll 1 tbsp. of the mixture into a little ball (it'll be pretty sticky). Put on a parchment lined cookie sheet and flatten. Place a chocolate chip (or half of a maraschino cherry) in the centre of each one.
3. Bake at 325 F for 10-12 minutes. Check them often, especially if you are using sugar in place of the agave, as they go from golden brown to burnt incredibly quickly.

Chocolate Macaroons
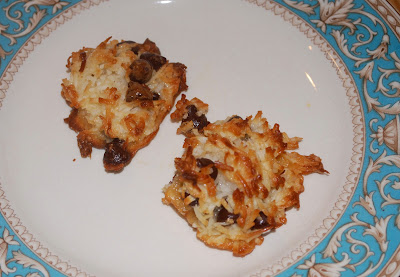
These were a favourite of my mom's when the Atkin's diet was all the rave. I'm not sure that they are really Atkin's diet friendly but they are pretty healthy, especially because I changed out the sugar for agave.

Ingredients

2 egg whites
2 tbsp. flour
1/4 c. agave nectar or 1/2 c. sugar
2 c. coconut (sweetened, desiccated) 
1/2 c. chocolate chips


Directions

1. Preheat oven to 350 F.
2. Beat the egg whites until frothy but they don't have to be stiff. Add the agave nectar or sugar and beat some more. Add the flour and beat until incorporated. Fold in the coconut and the chocolate chips.
3. Make mounds of 1 tbsp. of the mixture on a parchment lined cookie sheet. 
4. Bake for 8-12 minutes.  Be careful with these guys too, and watch them, because they can burn very quickly.

Super Healthy Banana Chocolate Cookies (Nikki's Healthy Cookies)
I stole this recipe from one of my favourite cooking blogs 101 Cookbooks .  I was at first somewhat skeptical as to what would hold these babies together, as there aren't any eggs or flour in them. I should know better and have faith in Heidi's recipes. I have to say that these are now my favourite vegan cookies ever (admittedly they are the only vegan cookies I've made). Try them though, I bet you'd be surprised by how good they are and you won't feel guilty about eating them!I stole this recipe from one of my favourite cooking blogs 101 Cookbooks .  I was at first somewhat skeptical as to what would hold these babies together, as there aren't any eggs or flour in them. I should know better and have faith in Heidi's recipes. I have to say that these are now my favourite vegan cookies ever (admittedly they are the only vegan cookies I've made). Try them though, I bet you'd be surprised by how good they are and you won't feel guilty about eating them!

Ingredients

3 large, ripe bananas, mashed
1 tsp. vanilla extract
1/4 c. coconut oil (warmed, so it will mix in, or you can use olive oil)
2 c. rolled oats
2/3 c. almond meal
1/3 c. coconut, shredded and unsweetened (mine was sweetened though, maybe that's why they tasted good)
1/2 tsp. cinnamon
1/2 tsp. sea salt
1 tsp. baking powder
1/2 c. carob chips or chocolate chips

Directions:
1. Preheat the oven to 350 F.
2. Mix the bananas, vanilla, and coconut oil. In another bowl, mix the oats, almond meal, coconut, cinnamon and salt. Add the dry ingredients into the wet and stir until combined. Fold in the carob/chocolate chips.
3. This batter will seem loose but it will hold together, I promise. Drop tablespoon sized dollops of batter onto a parchment lined cookie sheet and kind of pat them to make sure that they are together.
4. Bake for 12-14 minutes. 


As for the Hot Cross Buns and the Chocolate Cherry Bread, I cheated hard core and made basic white bread recipes in the bread machine and added in the spices, raisins and mixed peel to make the buns and dark chocolate chips and dried cherries to make the bread. I then baked them on a pizza stone in a preheated oven of 500 F, which as soon as you get your bread into you turn down to 375 and bake them until when you rap on them they sound hollow. (It's just what I've been told to do and it works!) If you really want to make sure they are done in a more scientific way you can use a thermometer and make sure they are at an internal temperature of 210 F.


So instead of doing my last assignment today, I baked. Who knew procrastinating could be so productive?


Thursday, December 2, 2010

Gingerbread!!

Are you ready to see the most adorable gingerbread house ever? I don't think you are. I don't think I should show you...because it is so adorable that you might not be able to handle it. Honestly.

This week, in preparation for the Rotary House Tour and a night of fun(draising) at Willowbank Kristina, Ashleigh and I, set out to make a fantastic gingerbread house. We based the design off of Bob Watson's house, which you may remember I wrote about way back in September. You should definitely click on the link above to go back and refresh yourself on what Bob's house looks like so that you can see just how awesome our tiny gingerbread house turned out.

It definitely was a labour of love and after much bickering over the recipe, decorations, scale, what should and shouldn't be included (and also about 40 hours of labour, yikes!) we were totally awed and satisfied with our resultant creation. I think if you want to see it there should definitely be a drum roll in here, feel free to drum along. Pa-rum-pum-pum-pum, rum-pum-pum-pum, rum-pum-pum-pum. (Shhh, stop laughing, this is appropriate given the season, plus its the only drum roll I know how to produce with onomatopoeia.)

Anyways, too much to do when no further to do would have done just right.

Ta-Da!:

The front! (And Kristina keeping a very intensely steady hand as she pipes the final details on: the historically accurate downspouts.)

The Side!
The other side and back!
And in case anyone thinks we are crazy for having done this. We thought of it as a self-imposed mini-exam. We discussed so many architectural terms while creating this baby that its not even funny. Also we are now totally down with the proportions necessary for a Georgian/Loyalist house.

This also gave Kristina a chance to spread the word on flooding. What is flooding you may ask? Well, its the method by which we made all that wonderfully smooth stonework on the facade of the house. You pipe regular strength royal icing around what you want to fill in, then you water down the icing and pipe it into the space between. And if you are crazy like us, you apply that to the whole cookie/house.

So we brought this gorgeous puppy into school where they are being auctioned off along with houses by local bakeries and other gingerbread house architects. Here are some of my favourites that I happened to snap pictures of as they were being set up.

We weren't the only students partaking in the auction. Here is Doug's political statement/art piece. Those are little garbage trucks on the bridge dumping 'waste' on the slum below. I'll let you fill in your own commentary and figure out the latin yourself. Hopefully all the little old biddies who will be bidding on them won't remember as much.
I really liked this one. It's really simple but fantastically whimsical and wonderfully executed. I think if I were a bird I'd definitely want to spend Christmas in this house.

And of course I can't leave out Julian and his wife Betsy's Queen Anne masterpiece.  (We snuck into Julian's office yesterday to steal a peek and see what we were up against.)